In this article, we'll explore how Rack fits into the HTTP request-response cycle in Ruby web applications.
Learning about Rack gave me deeper insight into how web servers and web frameworks communicate in Ruby.
In Ruby, there are many web servers such as Puma, Unicorn, and Thin, as well as frameworks like Rails, Sinatra, and Hanami. For a web application to work, these components need a way to communicate with each other.
While working with Rails, I was often curious about what happens behind the scenes when the server starts. How does the server know which application to run? How does it handle incoming requests and send responses back to the client?
To answer these questions, we'll explore why Rack was created, the problem it solves, how middleware works, and finally build a small Rack application from scratch.
1. The Problem
Rack solves a specific issue in the HTTP request-response lifecycle. To understand Rack, we need to go back in the world where Rack doesn't exist.
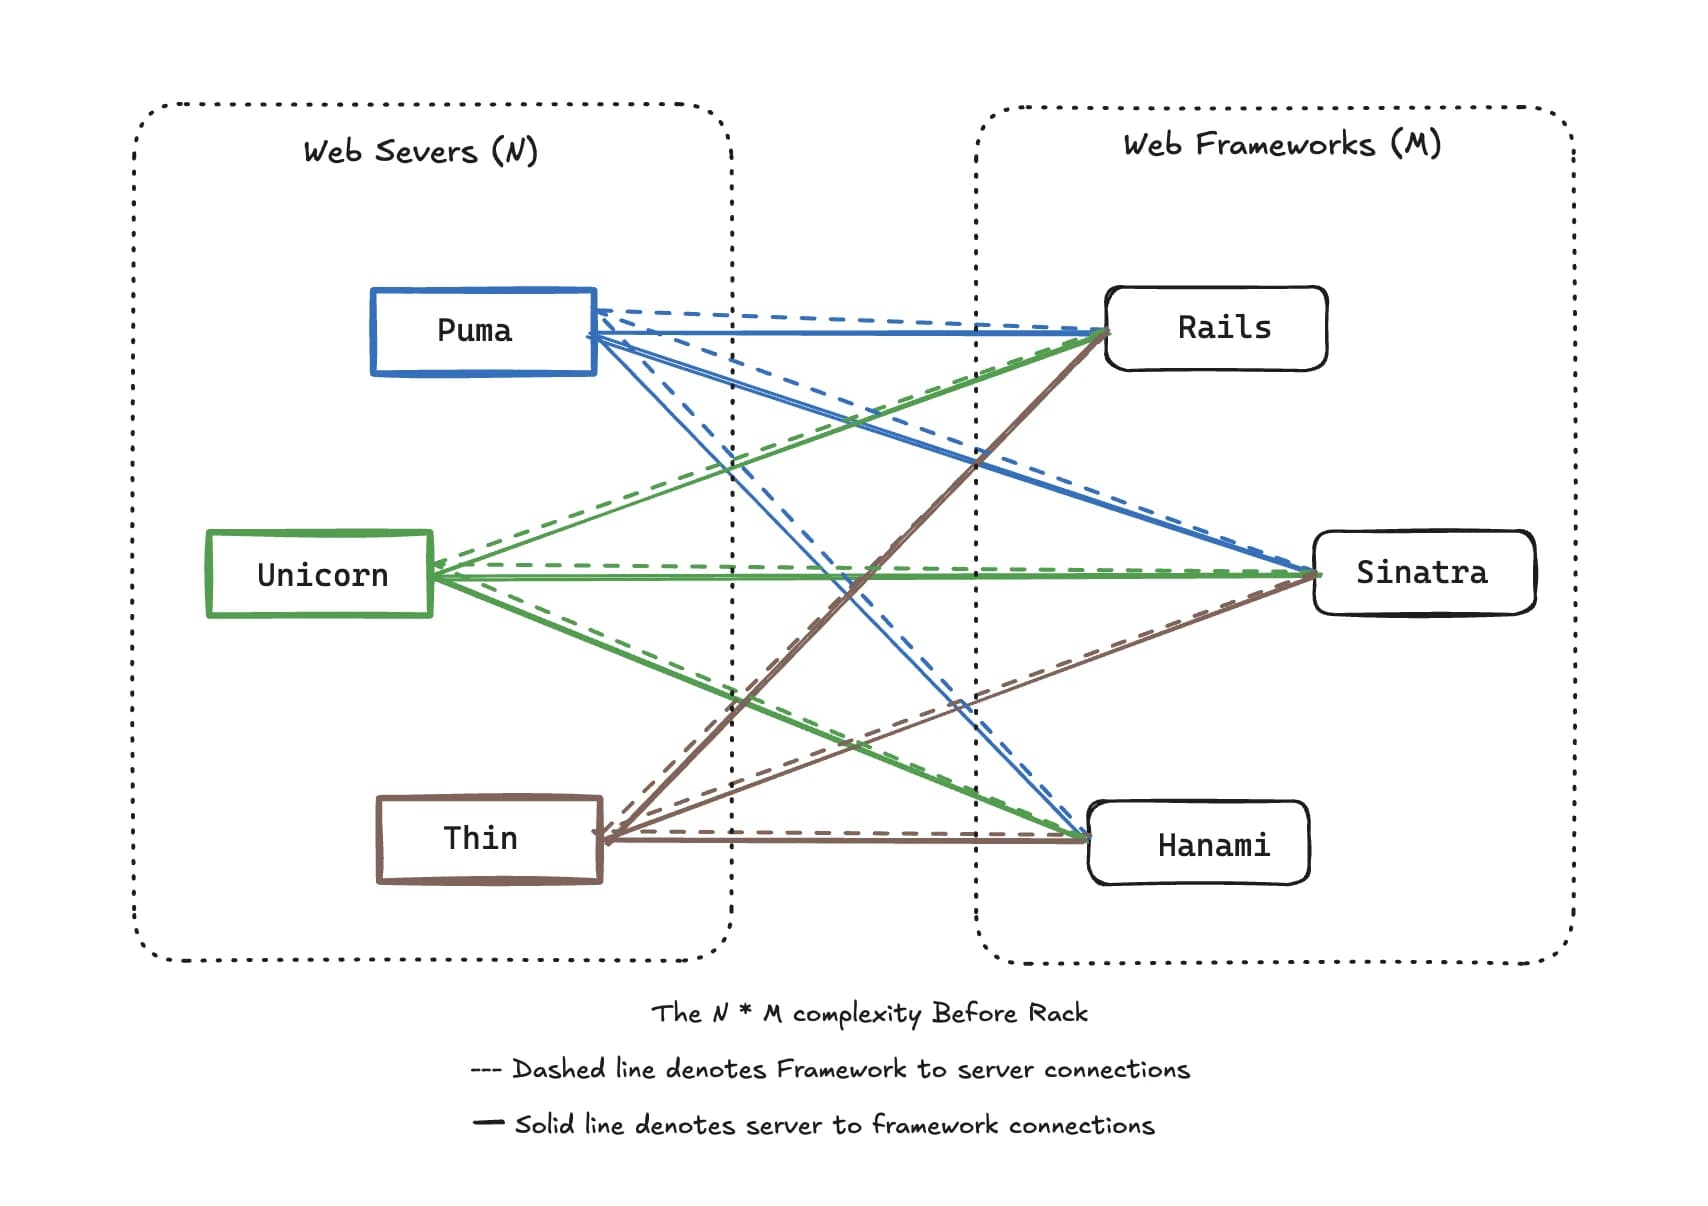
Before Rack was introduced, web servers and web frameworks often depend on custom integrations.
If we were building a web server, we would need to write custom integration code for every framework or application we wanted to support, such as Rails, Sinatra, or even a plain Ruby application.
Similarly, if we were building a framework, we would need to write custom handlers for every web server we wanted to support.
This created complexity on both sides, as building a new server or framework required significant integration work.
It also led to a significant amount of code duplication, as similar integration logic had to be implemented repeatedly across different servers and frameworks.
The diagram below illustrates the problem before Rack was introduced.
2. Understanding Rack
To solve these integration challenges, a common interface was needed between web servers and web applications.
That's where Rack comes in. According to the Rack documentation, Rack is a minimal, modular, and adaptable interface that unifies communication between Ruby web servers, web frameworks, and middleware.
The Rack Protocol
At its core, Rack is a protocol that defines a simple contract that Ruby applications and servers must follow to be Rack-compliant.
What Makes an Application Rack-Compliant?
To be Rack-compliant,
an application or framework must implement a call method
that follows Rack's conventions.
The call method accepts a single argument, env, which is a hash containing information
about the incoming request and the server environment.
The call method must return an array containing three elements:
- Status code (Integer) — e.g. 200, 404
- Headers (Hash)
- Response body (Enumerable)
Here's a simple example of a Rack-compliant application:
class MyRackApp
  def call(env)
    [200, { 'content-type' => 'text/plain' }, ['Hello, World!']]
  end
end
Rack Server
For a web server to be Rack-compatible, it must know how to invoke a Rack application's call method.
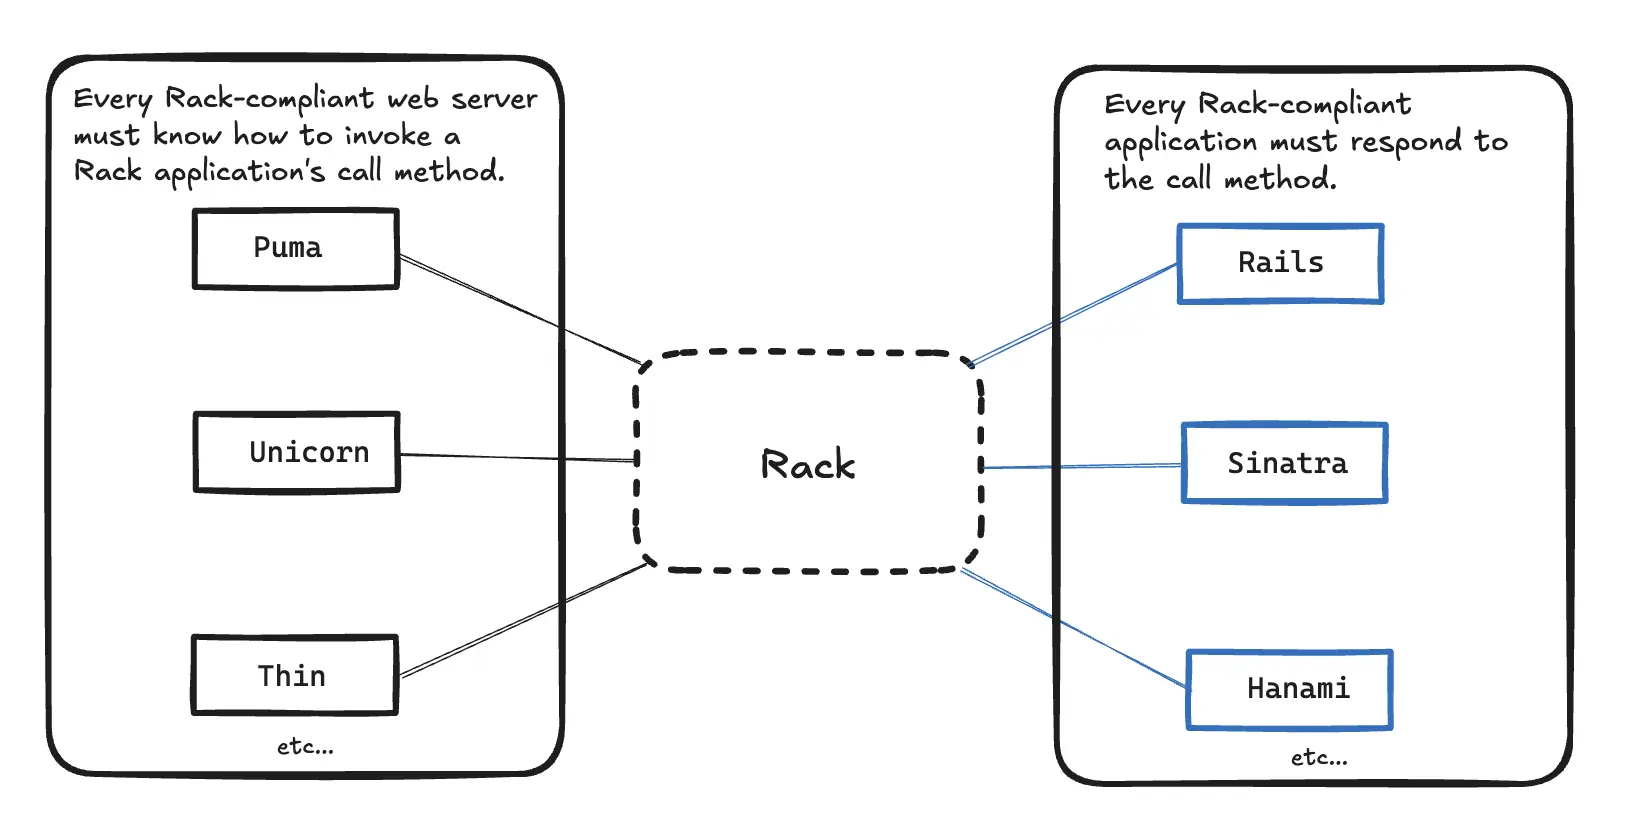
Rack is not a web server or a framework. It is a protocol that defines how the two communicate.
3. The Rack gem and Middleware
So far, we've looked at the Rack protocol, a set of conventions that allows web servers and web applications to communicate through a common interface.
The Rack gem is a Ruby library that provides the tools and infrastructure needed to work with the Rack protocol. It also includes a collection of built-in middleware components.
What is middleware?
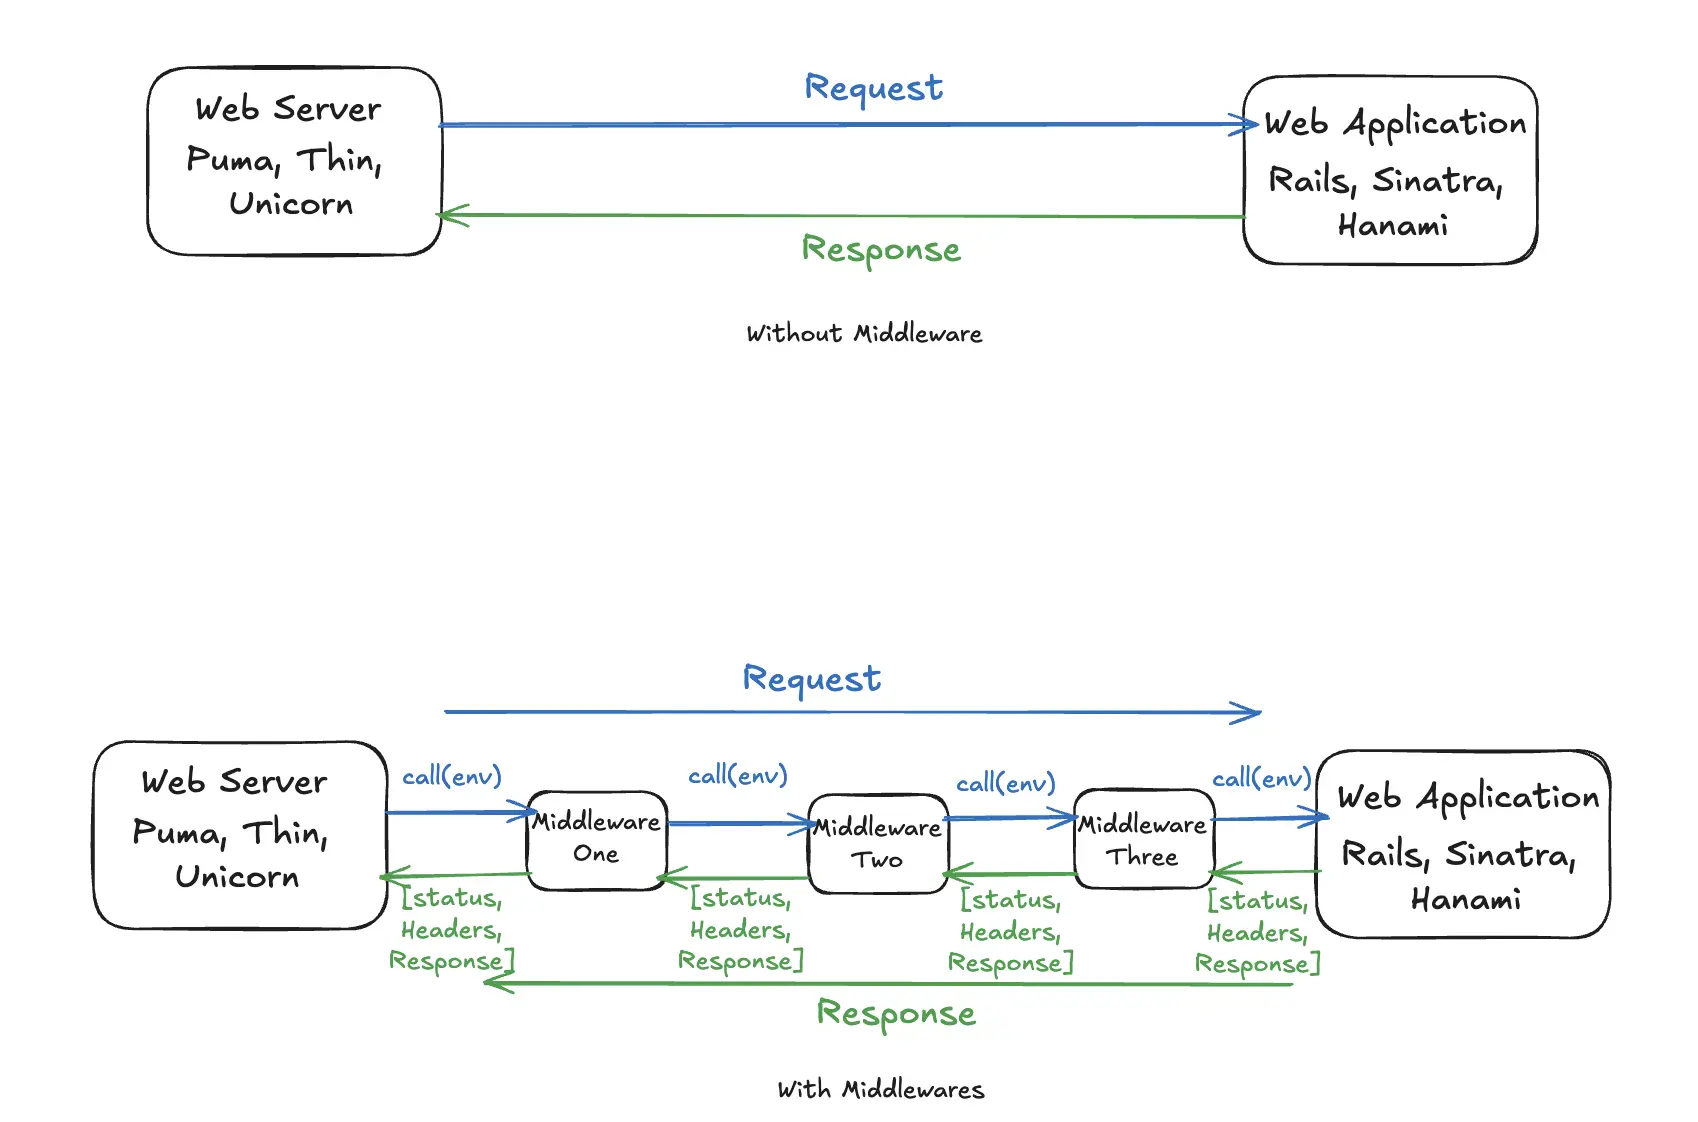
At a high level, a Rack middleware is a component that sits between the web server and the application.
It can process a request before it reaches the application and/or process a response before it is sent back to the client.
Like any Rack application, middleware responds to the call method. It sits between the server and the application, allowing it to inspect or modify both the incoming request and the outgoing response as they pass through the middleware chain.
Many applications require common functionality such as logging, authentication, session management, and request parsing.
Without middleware, each application or framework would need to implement these features on its own, leading to duplicated code and reduced reusability.
Middleware allows these concerns to be implemented in a modular way and reused across different applications and frameworks.
The Rack gem includes several built-in middleware components, such as:
- Rack::Files: Serves static files such as images, stylesheets, and JavaScript assets.
- Rack::Session: A component used for managing user sessions.
- Rack::Logger: Sets log tags, logs the request, calls the app, and flushes the logs.
- Rack::MethodOverride: Allows HTML forms to simulate HTTP methods such as PUT and DELETE by using the _method parameter.
Every Rack middleware is a Rack application, but not every Rack application is a Rack middleware. So structurally, a middleware is just another Rack application because it follows the same Rack protocol.
More precisely, middleware is usually a Rack application wrapper.
It receives another Rack application during initialization and
behaves like a Rack application itself by responding to the call method.
While plain Rack app (say, a Sinatra or Rails app sitting at the end of the stack) doesn't wrap anything. It terminates the chain rather than forwarding through it, so it isn't middleware.
You can find the full list of middleware included in the Rack gem in the Rack source code repository
Middleware Stack
A middleware stack is an ordered chain of middleware components. Requests travel down the stack toward the application, while responses travel back up the stack toward the client.
This allows each middleware to inspect or modify both the incoming request and the outgoing response.
Config.ru and Rack DSL
The config.ru is a configuration file that
specifies how a Rack application should be built and executed.
This file tells Rack:
- Which application should handle the request?
- Which middleware should wrap that application?
We can use a different file name if we want to,
but by convention everyone uses config.ru.
# config.ru

use RequestLogger
use Authentication

run MyRackApp.new
In this example, use and run are part of Rack's DSL (Domain-Specific Language).
use: Adds middleware to the stack.
run: Specifies the final Rack application.
Rack processes use statements from top to bottom,
wrapping each middleware around the application specified by run.
For example:
use RequestLogger
use Authentication

run MyRackApp.new
effectively becomes:
RequestLogger.new(
  Authentication.new(
    MyRackApp.new
  )
)
Rackup Command
Rack applications are commonly started using the rackup command.
Previously,
it was part of the Rack gem, but as of Rack 3,
the rackup command has been moved to a separate Rackup gem.
~ rackupWhen executed, Rackup typically:
- Reads the config.ru file
- Builds the middleware stack
- Constructs the Rack application
- Starts a compatible web server such as Puma, Unicorn, or Thin
Custom Middleware
We can also create our own middleware by creating a Rack-compliant class that wraps another Rack application and responds to the call method.
Let's create a simple middleware that logs the request path and method. We will use this middleware in our mini web application later.
class RequestLogger
  def initialize(app)
    @app = app
  end

  def call(env)

    request = Rack::Request.new(env)
    puts "Received #{request.request_method} request for #{request.path}"
    @app.call(env) # Call the next middleware or application
  end
end
Let's understand what this middleware is doing:
First,
we defined the custom middleware class RequestLogger,
which will log the information about incoming requests.
Next, we define the initialize method, which receives the next Rack application in the chain and stores it in the @app instance variable. This allows our middleware to forward requests to the next layer in the middleware stack.
The call(env) method is part of the Rack protocol
for Rack applications and middleware.
In this method, we first create a Rack::Request object.
This provides a convenient interface for accessing request
information instead of manually reading values from the env hash.
We then log the request method and path:
puts "Received #{request.request_method} request for #{request.path}"
Finally, the request is forwarded to the next middleware or application by calling @app.call(env).
Middleware can also inspect or modify the response before it is returned to the client.
def call(env)

 status, headers, body = @app.call(env)

 headers["X-Powered-By"] = "MyRackApp"

 [status, headers, body]
end
In this example, the middleware intercepts the response returned by the next application, adds a custom header, and then returns the modified response.
4. Building a Mini Web Application with Rack
Now that we have understood the basics of Rack and middlewares, let's build a mini web application using Rack.
Step 1: Create a project
Let's create a new directory for our Rack application and install the Rack gem.
~ mkdir my_rack_app
~ cd my_rack_app
~ bundle init
~ echo "gem 'rack'" >> Gemfile
~ echo "gem 'rackup'" >> Gemfile
~ echo "gem 'puma'" >> Gemfile
~ bundle install
Here, we created a new project, initialized Bundler, and added the rack, rackup, and puma gems to the Gemfile.
Step 2: Create a Rack Application
Let's create a simple Rack application that responds with "Hello, World!,
I'm a Rack application."
For that, we will create a new file application.rb and add the following code:
class MyRackApp
  def call(env)
    [
      200,
      { "content-type" => "text/plain" },
      ["Hello, World!, I'm a Rack application."]
    ]
  end
end
This call method returns the three values required by the Rack protocol: a status code, a headers hash, and a response body.
Step 3: Create a config.ru file
Next, we'll create a config.ru file that tells Rack which application to run and how the middleware stack should be built.
# config.ru

require_relative 'application'
run MyRackApp.new
Step 4: Start the Rack application
To start the application,
we can use the rackup command in the terminal.
-> rack-demo rackup

Puma starting in single mode...
* Puma version: 7.2.0 ("On The Corner")
* Ruby version: ruby 3.4.5 (2025-07-16 revision 20cda200d3) +PRISM [arm64-darwin24]
*  Min threads: 0
*  Max threads: 5
*  Environment: development
*          PID: 54175
* Listening on http://127.0.0.1:9292
Visiting http://127.0.0.1:9292 should display:
Hello, World!, I'm a Rack application.
Step 5: Using Custom Middleware
Earlier, we created a custom middleware called RequestLogger. Let's extend it slightly so that it both logs requests and modifies the response.
class RequestLogger
  def initialize(app)
    @app = app
  end

  def call(env)
    request = Rack::Request.new(env)

    puts "#{request.request_method} #{request.path}"

    status, headers, body = @app.call(env)

    headers["x-powered-by"] = "MyRackApp"

    [status, headers, body]
  end
end
This middleware will log the request method and path,
and also add a custom header x-powered-by to the response.
We will also add another Rack middleware,
Rack::ContentLength,
which automatically adds the Content-Length header to the response.
Now let's use them in our application.
We will modify our config.ru file to include the middleware.
# config.ru

require_relative 'application'
require_relative 'request_logger'

use Rack::ContentLength
use RequestLogger
run MyRackApp.new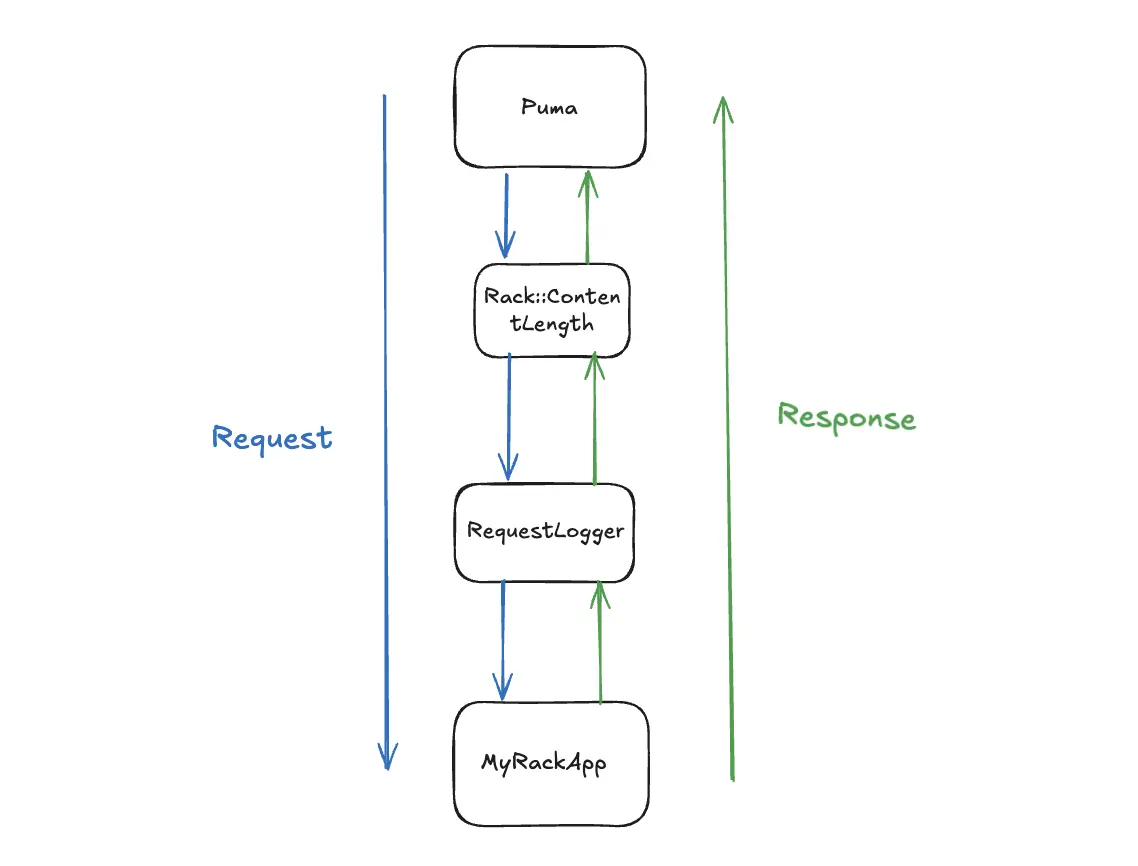
Let's restart our application and see the changes using curl.
~ curl -i http://localhost:9292
HTTP/1.1 200 OK
content-type: text/plain
x-powered-by: MyRackApp
content-length: 38

Hello, World!, I'm a Rack application.
In the terminal where our application is running, we should see the log of the request method and path.
-> rack-demo rackup
Puma starting in single mode...
* Puma version: 7.2.0 ("On The Corner")
* Ruby version: ruby 3.4.5 (2025-07-16 revision 20cda200d3) +PRISM [arm64-darwin24]
*  Min threads: 0
*  Max threads: 5
*  Environment: development
*          PID: 56765
* Listening on http://127.0.0.1:9292
* Listening on http://[::1]:9292
Use Ctrl-C to stop
GET /
This shows that our custom middleware is working and logging the incoming request.
This is a very basic example of how to build a mini web application using Rack. We can further enhance this application by adding more routes, handling different HTTP methods, and adding more middlewares for functionalities like authentication, session management, etc.
Rack provides the foundation for how Ruby web servers, frameworks, and middleware communicate. Understanding its architecture makes it much easier to reason about how frameworks such as Rails handle requests and responses under the hood.
Now we can answer the questions we started with. When a Rails application boots, Rails exposes a Rack-compliant application. A Rack-compatible server such as Puma loads that application, builds the middleware stack, and forwards incoming requests through it before returning responses to the client.
If you want to explore more about Rack and its capabilities, you can check out the official documentation and source code on GitHub.
Once we understand Rack, It helps us in understanding Rails Initialization Process. You can read about it in this article.